

Every site in Vimonto Deploy has its own Nginx configuration: one file with the server blocks for its domains, HTTPS and application. Vimonto Deploy writes this file for you and keeps it up to date when you change domains, certificates or settings.
The Nginx page of a site shows the configuration and lets you edit it. Every change is tested with nginx -t before it goes live; if Nginx rejects it, the previous configuration stays active. You find the page in the site's sidebar under Nginx.
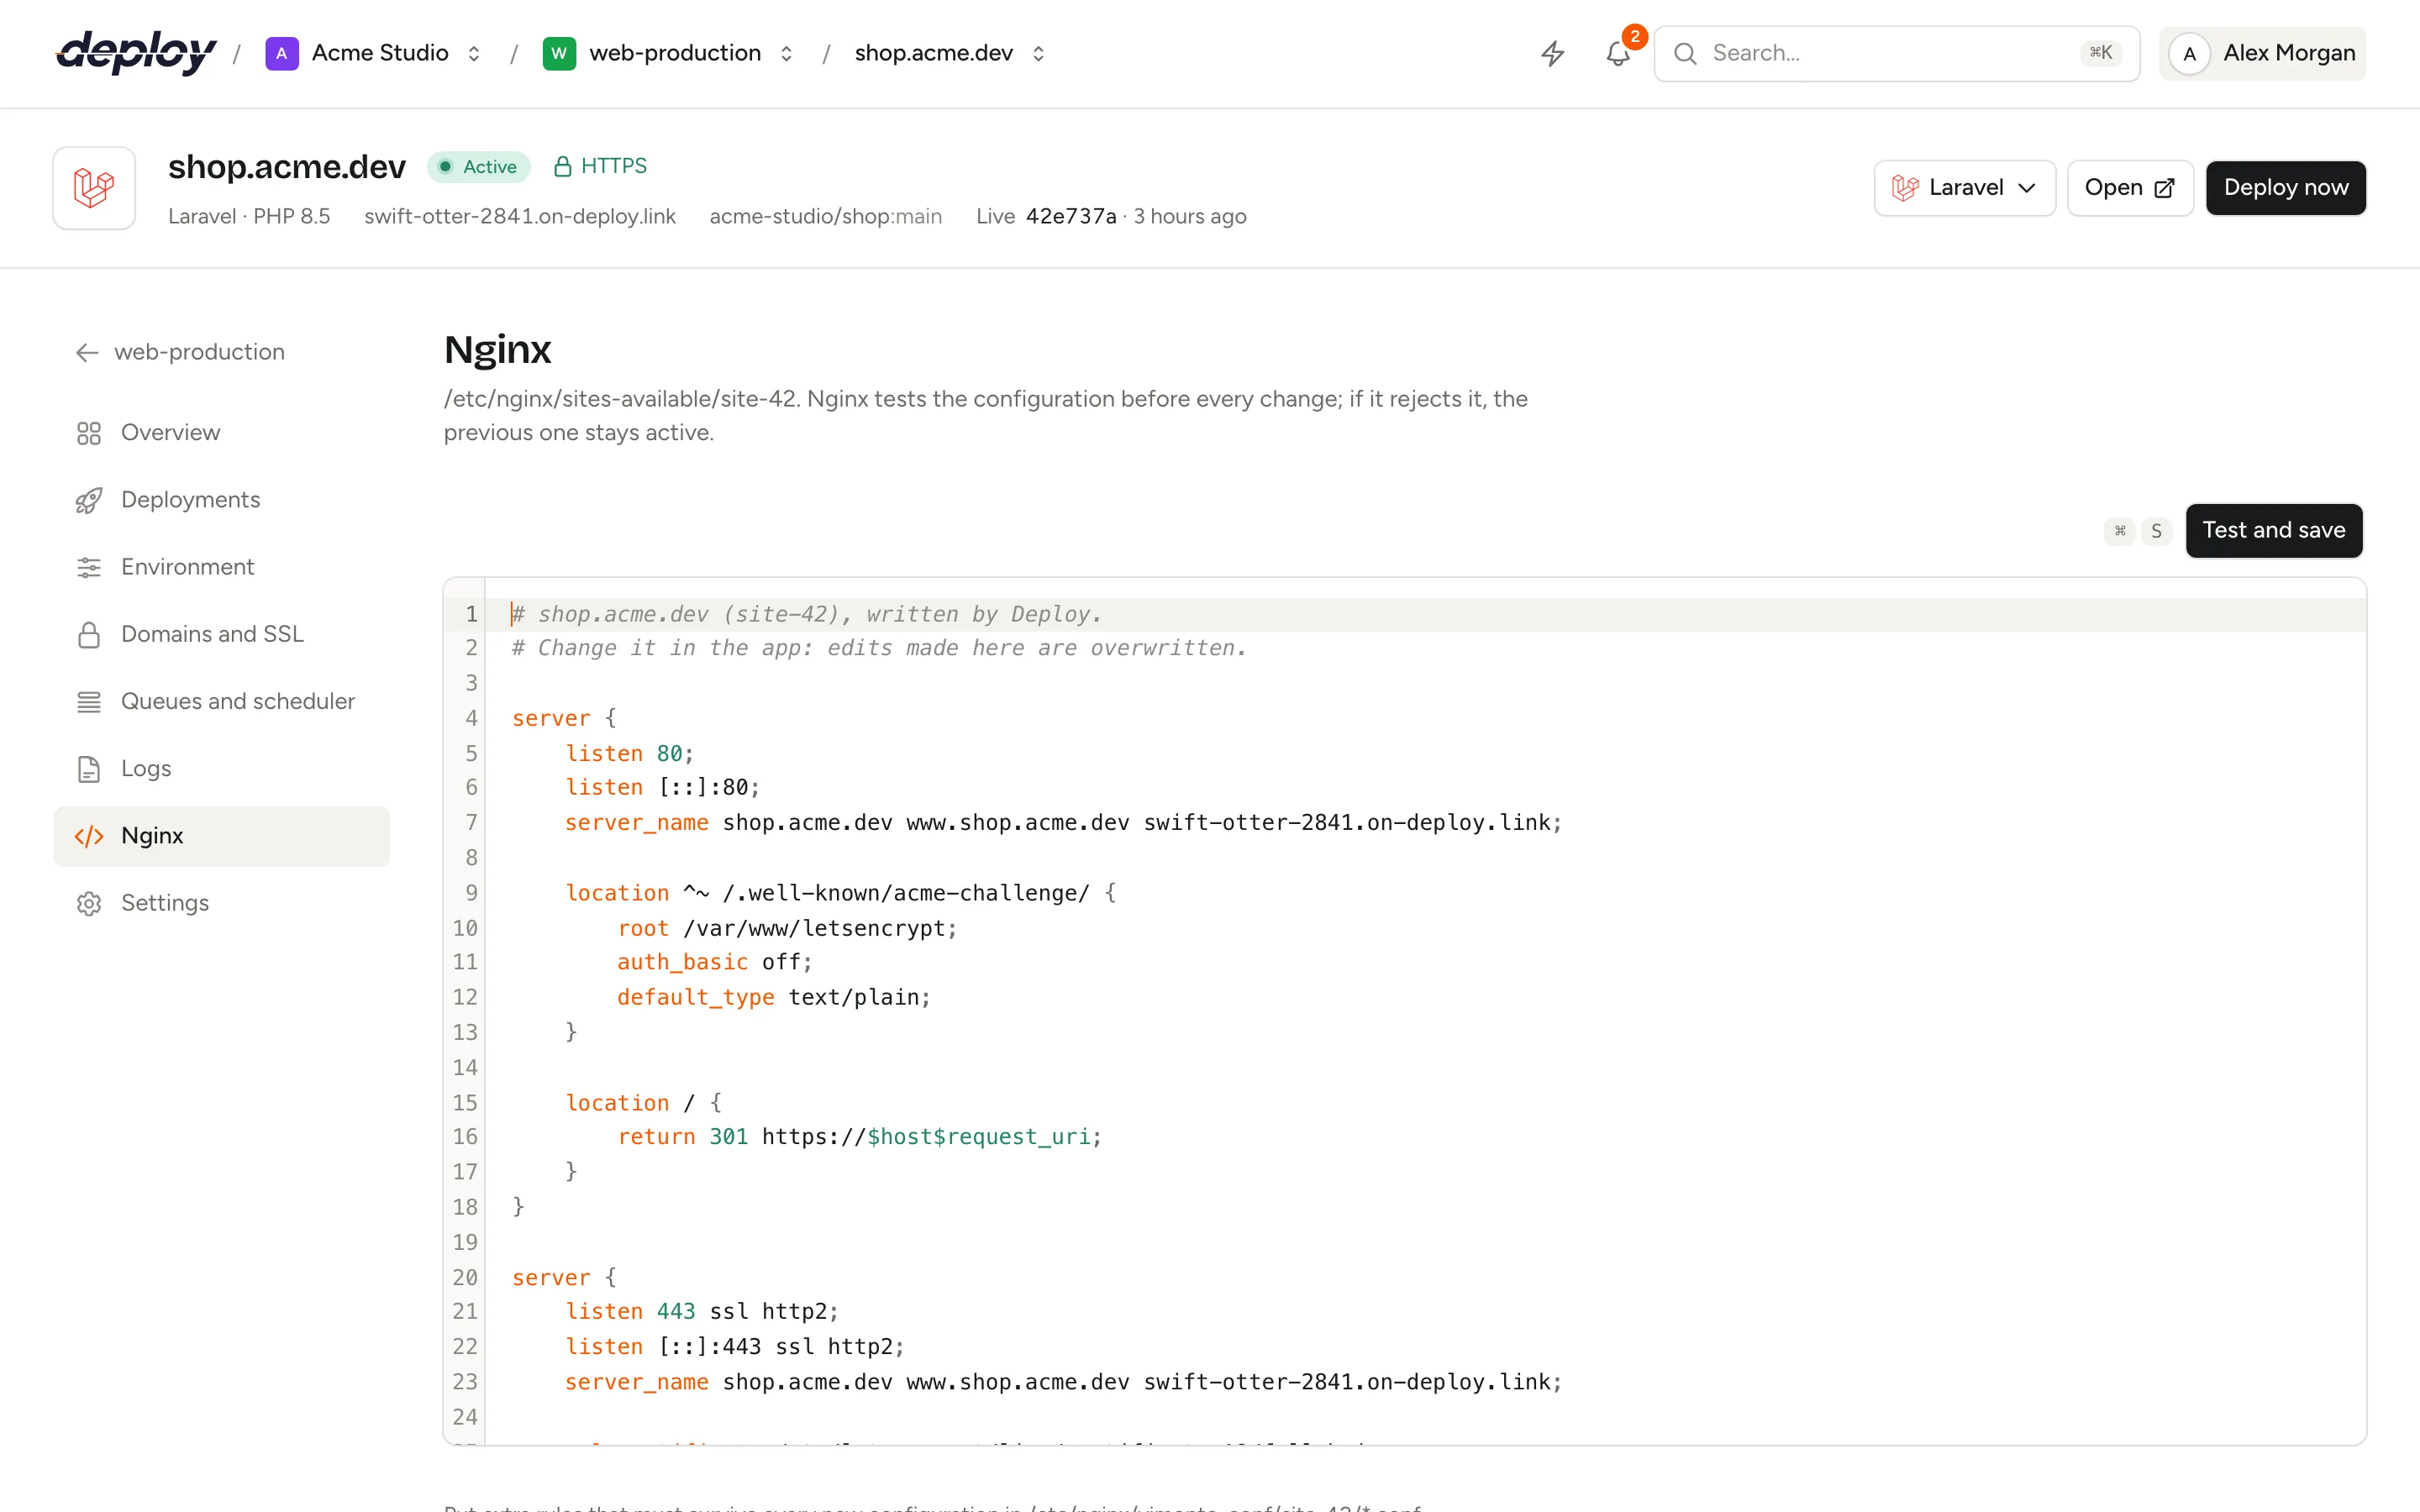
Where is the configuration on the server?
| Path | What it is |
|---|---|
/etc/nginx/sites-available/site-{id} |
The site's configuration. {id} is the site's number in Vimonto Deploy; the path is shown at the top of the page. |
/etc/nginx/sites-enabled/site-{id} |
A symlink to the file above, which makes Nginx load it. |
/etc/nginx/vimonto-conf/site-{id}/*.conf |
Extra directives, loaded inside the site's server block. |
/var/log/nginx/site-{id}-access.log and -error.log |
The site's request and error logs, readable on the Logs page. |
Do not edit these files on the server by hand: the next time Vimonto Deploy writes the configuration, your changes are overwritten. Edit the configuration on the Nginx page, or put extra directives in the include folder.
What is in the generated configuration?
The generated configuration depends on the site's domains, its certificate and its type.
- Domains. The site is served on its own domains and its generated address. Each domain's www setting becomes a redirect block, for example from
www.example.comtoexample.com. See domains and SSL. - HTTPS. With an active certificate, port 80 only answers Let's Encrypt challenges and redirects everything else to HTTPS. The HTTPS block listens on port 443 with HTTP/2 (
listen 443 ssl http2;, which works on the Nginx of every supported Ubuntu version), TLS 1.2 and 1.3, a shared TLS session cache, and an HSTS header (max-age=31536000). - Web root.
rootpoints to the site's web directory in the live release, for example/home/vimonto/example.com/current/public. - Logs. Each site writes its own access and error log.
- Include. The include folder for extra directives is loaded inside the server block.
- Application. Depends on the site type:
| Site type | What the configuration does |
|---|---|
| Laravel and PHP | Sends requests that do not match a file to index.php and passes PHP to PHP-FPM over a Unix socket. Laravel sites also send 404 errors to index.php. |
| Static | Serves files, trying $uri, $uri/ and $uri.html, else a 404. |
| Node.js | Proxies every request to your app on 127.0.0.1 and the port you set, with WebSocket support and X-Forwarded-* headers. |
| Load balancer | Proxies every request to the app servers in an upstream block, or answers 503 while there are none. See load balancing. |
- Protection. Hidden files such as
.envand.gitare denied, except/.well-known. Requests forfavicon.icoandrobots.txtare not logged. - Behind a load balancer. On an app server behind one of your load balancers, the site trusts that balancer, and only it, for the visitor's IP address (
set_real_ip_from) and for HTTPS (X-Forwarded-Proto). A site there with its own certificate also serves the balancer over plain HTTP instead of redirecting it to HTTPS, so the two don't send each other round in circles; everyone else still gets the redirect.
A shortened example for a Laravel site with HTTPS:
server {
    listen 443 ssl http2;
    listen [::]:443 ssl http2;
    server_name example.com;

    ssl_certificate /etc/letsencrypt/live/certificate-3/fullchain.pem;
    ssl_certificate_key /etc/letsencrypt/live/certificate-3/privkey.pem;
    ssl_protocols TLSv1.2 TLSv1.3;
    ssl_prefer_server_ciphers off;
    ssl_session_timeout 1d;
    ssl_session_cache shared:VimontoSSL:10m;
    add_header Strict-Transport-Security "max-age=31536000" always;

    root /home/vimonto/example.com/current/public;
    index index.html index.htm index.php;
    charset utf-8;

    access_log /var/log/nginx/site-12-access.log;
    error_log /var/log/nginx/site-12-error.log error;

    # Extra directives for this site, kept when the config is written again.
    include /etc/nginx/vimonto-conf/site-12/*.conf;

    location / {
        try_files $uri $uri/ /index.php?$query_string;
    }

    error_page 404 /index.php;

    location ~ \.php$ {
        fastcgi_pass unix:/run/php/php8.4-fpm.sock;
        fastcgi_param SCRIPT_FILENAME $realpath_root$fastcgi_script_name;
        fastcgi_param DOCUMENT_ROOT $realpath_root;
        include fastcgi_params;
        fastcgi_hide_header X-Powered-By;
        fastcgi_read_timeout 120;
    }

    location ~ /\.(?!well-known).* {
        deny all;
    }
}
$realpath_root makes PHP see the real release directory instead of the current symlink, so a new release is used as soon as it goes live. An isolated site uses its own PHP-FPM socket, /run/php/site-{id}.sock.
Add extra directives without replacing the configuration
For most changes you do not need to edit the configuration itself. Put a .conf file in the site's include folder, /etc/nginx/vimonto-conf/site-{id}/. Nginx loads every .conf file there inside the site's main server block, and the folder is kept whenever Vimonto Deploy writes the configuration again.
For example, to add security headers, create /etc/nginx/vimonto-conf/site-12/headers.conf in the terminal:
add_header X-Frame-Options "SAMEORIGIN" always;
add_header X-Content-Type-Options "nosniff" always;
Then test and reload Nginx with sudo nginx -t && sudo systemctl reload nginx, or click Reload for Nginx on the server's Services page.
Site features use the same folder: Password protection, Reverb and WordPress Hardening each write their own feature-{key}.conf file there.
Edit the configuration
- Open the site and choose Nginx in the sidebar.
- Change the configuration in the editor.
- Click Test and save, or press Cmd+S (Ctrl+S on Windows and Linux).
Saving runs as a background task named Saving the Nginx configuration of your domain:
- Vimonto Deploy keeps a copy of the current configuration and writes yours.
- It runs
nginx -tto test the whole Nginx configuration. - If the test passes, Nginx is reloaded and your configuration is stored.
- If the test fails, the previous configuration is put back, Nginx keeps running unchanged, and the task fails with Nginx rejected the configuration; the previous one is still active. The task output shows the error from
nginx -t.
A typo can therefore never take the server's other sites down.
What changes when you use your own configuration?
Once you saved your own configuration, the page shows Custom configuration. From then on, Vimonto Deploy no longer writes the configuration for you, and you manage these yourself:
- domains and aliases, and the www redirect;
- HTTPS: when you install a certificate, the task tells you the certificate paths to add yourself;
- the web directory, PHP version (the PHP-FPM socket) and port of a Node.js app, when you change them in the site settings;
- for a load-balanced site, the app servers and method: changes on the Load balancing page are saved but not applied, until you restore the default configuration;
- for a site behind a load balancer, the lines that trust the balancer.
Keep the include /etc/nginx/vimonto-conf/site-{id}/*.conf; line in your configuration. Without it, the site features that add Nginx directives cannot be switched on.
Restore the generated configuration
Click Restore default and confirm. Your own changes are lost, the generated configuration is written and tested the same way, and Vimonto Deploy manages domains and HTTPS for you again.
Who can edit the configuration?
Every member can read the configuration. Saving and restoring need the permission to manage sites (owner, administrator, manager and developer), and the site and server must be active; otherwise the editor is read-only. See members and roles.
Frequently asked questions
How do I increase the upload size for my Laravel site?
Change the maximum upload size on the server's PHP page. It sets PHP's upload limits and Nginx's client_max_body_size for the whole server (64 MB by default), so you do not need to edit the site's configuration.
How do I add headers or redirects?
Use the include folder for headers (add_header) and simple redirects (location = /old { return 301 /new; }). For changes outside the server block, such as a new server block, edit the configuration on the Nginx page.
Why did my change not go live?
Open the task on the server's activity or the activity page and read the output of nginx -t. It names the file and line Nginx rejected.
Can I see the configuration of every site on a server?
Each site's configuration is on its own Nginx page. All files are in /etc/nginx/sites-available on the server.